Color: History!! Chemistry!!!!
Marcy Petrini
October, 2017
Don’t get put off by the title!
In October, my husband Terry Dwyer and I visited the Indianapolis Museum of Art for a fabulous exhibit called The Chemistry of Color. My intent was to come home and write my blog about it. But as Terry and I talked, we realized that the exhibit had piqued our curiosity even more and raised more questions than answers.
Terry (whose chemistry knowledge is far superior then mine, even though I have an undergraduate degree in it) started looking for answers – and the more he looked, the more curious we became….
Until he decided that all of that wonderful information should go on his newly established web site.
Here is a direct link to the summary of the exhibit in Terry’s website.
He is also writing summaries of the 12 pigments showcased in the exhibit, there are 5 listed in various levels of completion. Two that are finished are Prussian blue (a pigment that owes its existence to the Castle Frankenstein) and ocher (King Midas could almost certainly have turned everything he touched to a golden color).
Even if you aren’t interested in the chemistry, there are all sorts of historical facts that I find fascinating, in particular the incidents surrounding the discovery of that unmistakable blue.
Enjoy!
Please email comments and questions to
Weaving with with Yarn from the Stash
Marcy Petrini
September, 2017
The shawl I talked about last month was woven at the end of 2015. I had bought all of the Angora yarn that I had been able to find a few months earlier. I had used up 21 balls; the remaining 14 balls went to the “white” shelf – my yarn is stored in open shelves by color; the Angora wasn’t really white, but close enough for the purpose of storage. I periodically would have to move it out of the way to get to some other yarn, and every time, I would think: “this yarn feels so wonderful, I really should do something with it.”
In the middle of this year, I decided I would take my advice. Now I had to figure out what I could do with what I had since I really couldn’t buy more and even if I could, the color may not be the same. The 14 balls were 686 yards, too much for a scarf and not enough for a shawl, at least the size shawl I like – at least 20” wide (24” on the loom) and around 90” long (a warp about 3.5 yards long).
Assuming I would keep the beat at 12 ppi, as in the previous shawl, how much fabric would my Angora make?
Here is my thinking; 1” of fabric would need 24” times 12 ppi which is 288” or 8 yards; 686 is enough to make ~86”, which would be less than 80” after shrinkage, way shorter than 90” ...Uhmmmmmm…
Meanwhile I was thinking about the warp. At first I thought of using a colorful warp as I did in the previous shawl, just not the same yarn, but nothing I tried seemed to work well; the Angora had too much pink for most yarns I had. Finally I thought of trying black and that was the answer. I had a large cone of Jaggerspun Zephyr, 50% wool, 50% silk. I don’t weave much with wool because of our warm climate in Mississippi, but owning a warm shawl for some cold (relatively) nights going to a concert or a play would be nice.
My thinking is usually circular; so while I was pondering whether I had enough weft and what I should use for warp, I was also thinking of what pattern I should use. I wanted something I had never used before. This was going to be woven on my 4 shaft loom, so Davison is my go-to source. I found the long rib weave, as she calls it. Here is the drawdown:
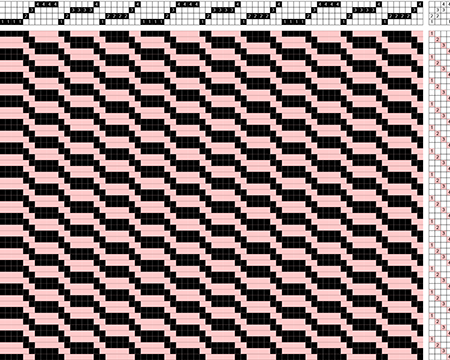
Click here for the full-sized draft (a PDF will open in a new window).
The floats could be a bit long, so I would set the Zephyr at 24 epi; I had plenty of warp yarn for 24” wide on the loom and 3.5 yards long. The weft however….
How about some Zephyr stripes? But how much?
To weave 94”, I would need 8” (94” – 86”) worth of Zephyr stripes, or approximately 1” of zephyr for every 12” of fabric, or ¼” for every 3 inch of fabric.
Confident that I wouldn’t run out of Angora, I warped the loom and, after starting, I thought I would make my life easier by weaving 9 repeats of the pattern with the Angora and 2 repeats with the Zephyr.
As I said, I am not used to weaving with wool, so my challenge turned out to be keeping the beat light and even. I tended to beat too hard, even with the tension on the warp lose. I ended up making myself a 3” cardboard ruler with 12 epi lines so I could easily check the beat.
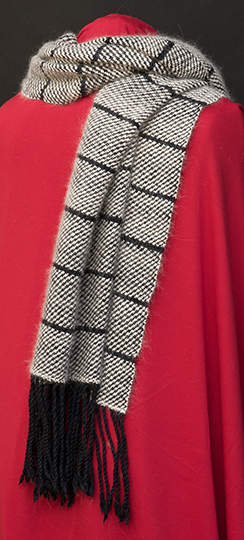
I am pleased with the shawl! It was finished in early August. It is 21” wide, the slightly wider width the result of the take-up and shrinkages less than planned (~6% rather than 10%); the 94” length was mostly from less take-up, about 3%, with slightly less shrinkage, ~ 5%; I do like long shawls, thus the extra length was a bonus. It’s still in the upper 80⁰s here, so it will be a bit before I can wear it, but here it is!
Please email comments and questions to
Weaving with Angora
Marcy Petrini
August, 2017
A little while back I wanted to weave a shawl that would be light and airy for a good friend who had admired a similar shawl I had woven; my shawl had been made with a silk warp and a 100% polyamide knitting yarn weft that sadly was not longer available.
I had traveled with my friend to her native Portugal, so I wanted to incorporate that experience in her shawl; I had a yarn that I thought would be perfect for the warp: Silky by Prism Yarns, dyed for HGA’s Convergence® 2008 in Tampa Bay; it is multicolor dark pastels that remind me of the colors of the house fronts in Lisbon. Silky is 75% rayon and 25% silk. The yarn has about 180 yards/oz.

For weft I thought 100% angora would be perfect. I was surprised how hard it was to find enough 100% angora for a 36” wide, 90” long shawl in light grey. I had to settle for a beige called “fawn”. It ended up working fine with the warp colors which tend to be toward a warm palette.
In buying the weft, since it’s a knitting yarn, there was no mention of wraps per inch, but each ball has 49 yards. So I bought 35 balls, which sounds like a lot, but that’s only 1,715 yards. I knew that I would use 1,763 yards of warp (sett at 15 epi), so I wanted to be safe. It turned out that the angora is 140 yards / oz.
With the multicolor warp and the fuzzy weft, I didn’t want any additional design elements, but I did want the drape of a twill. I used a broken twill to avoid the pattern.
The simplest broken twill comes from a straight twill that has been “broken”, by switching the order, either in the threading or in the tie-up / treadling. The patterns for the two options are turned, as you can see from the drawdowns below:

Click here for the full-sized draft (a PDF will open in a new window).

Click here for the full-sized draft (a PDF will open in a new window).
I used the straight twill threading and I “broke” the tie-so I can weave a straight treadling as shown in the second drawdown above. It’s my favorite way to break a twill; I like to switch the two middle treadles, which allows me to avoid floating selvages, since the beginning and the end of the treadling sequence is the same as a straight twill and the outer threads are caught if the threading starts on an odd shaft and ends in an even shaft (or vice versa).
When I am not familiar with a yarn, I like to try to weave what looks right by eye, continue for a few inches and determine whether the beat is appropriate for the hand I want for the fabric. Then I measure and try to keep to that beat throughout. For this shawl my beat was 11 – 12 ends per inch. Below is a picture of the fabric.

And of the shawl:

I used 21 balls, which means that I had 14 left or 686 yards, not quite enough for another shawl, but maybe…. Read next month’s blog to find out what happened!
Please email comments and questions to
Satins and Damasks – and Convergence® 2018!
Marcy Petrini
July, 2017
Before we go back to thinking about satins and damasks, I would like to report some exciting news: I have been accepted to present at Convergence® 2018 in Reno, Nevada. Here are the classes:
|
Class Title |
Hours |
Class Type |
|
A Pictionary of Weaving Structures |
3 |
3-Hour Seminar |
|
A Weaving Year of Wonder (4 Shafts) |
6 |
1-Day Workshop |
|
There is Nothing Plain about Plain Weave |
3 |
3-Hour Seminar |
|
Your Fabric is Not Always a Painting |
1.5 |
90-Minute Seminar |
I hope my classes will be well attended and I hope to see you next July 6 – 18, 2018 in Reno.
In the June blog, we saw a scarf that has blocks of sateen and satins on both sides of the fabric. When blocks of satin are combined, the resulting fabric is called a damask; each block can be woven either warp or weft dominant. Another example is below.

Similarly, on 8-shafts, we can weave two blocks of false satin, or a false damask.
There is one issue we need to consider when combining blocks in either satins or false-satins: floats where the blocks join.
Let’s think of how these flats are formed. In the 5-shaft satin drawdown in the June blog, we used the step to arrive at the threading; then we tied the loom in a straight draw, one shaft at a time, for the weft-dominant, or sateen side:

And then we treadled in order. As we saw, the resulting floats are 4-thread long.
It makes sense that to obtain the warp-dominant, or satin side, we could tie all of the shafts minus one, the “minus one” in the same order as for the sateen side; that is, for the sateen side, our first treadle is 1; for the satin side the first treadle is tied to everything but 1. Below is what we used for the draft in the June blog:

In combining the blocks and weaving them either warp or weft dominant, we can use that approach; each block is at least 5 shafts; the same step can be used for each block. Below is the drawdown, showing block A in pink, with three repeat of the step-2 satin. Block B is in green, same step, also with three repeats, using shafts 6 through 10.
Then we use the tie-up for the satin and sateen as we discussed above, but for each block, so that when one block weaves satin, the other weaves sateen and vice versa.
And finally we treadle each block, repeating the sequence as many times as we wish.

Click here for the full-sized draft (a PDF will open in a new window).
If we look closely at adjacent blocks, both horizontally and vertically, we see that our “rule” of a 4-thread float is broken: there are several places where the warp or weft floats are 5-thread long. While this may not be an issue in terms of float length – a 5-thread float may be fine for the intended use of the fabric – it is a disruption of the satin structure.
What we can do to return the 5-shaft satin blocks to 4-thread floats it to rearrange the tie-up. What I like to do is keep the sateen tie-up as a straight draw, but change the satin tie-up so that the “minus one” shaft is shifted by one treadle, as shown in the tie-up below:

When we apply this tie-up to the threading and treadling of the previous example, all the floats are never longer than 4 threads as can be seen in the following drawdown. This is why published drafts of satins and damasks may have an offset tie-up, sometimes shown in the treadling or in the lift plan.
The drawdown below also shows that we can weave both blocks as sateen and both blocks as satin, but we can quickly run out of treadles.

Click here for the full-sized draft (a PDF will open in a new window).
Similarly, we can derive the tie-up for false damask, using blocks of 3/1 broken twill. Below is the drawdown with two blocks and all the treadling possibilities.

Click here for the full-sized draft (a PDF will open in a new window).
As I mentioned before, these fabrics are denser: for any given yarn, the warp must be set more closely to obtain an appropriate warp-dominant side; and the beat must be higher to obtain an appropriate weft-dominant side. If your fabric is too heavy, try using yarns of smaller grist. The long floats provide lots of drape which can be accentuated by using slick yarns like the traditional silk, but also the newer fibers like Tencel® and bamboo. The shawl shown above was woven using 10/2 Tencel® from Convergence® 2014 and it has a nice drape, despite the fact that the yarn is not particularly thin.
Happy exploring satins and damasks!
Please email comments and questions to
Satins and Sateens (Part 2)
Marcy Petrini
June, 2017
Last month we talked about how to obtain steps to derive the threading for a satin; while we call satin the warp-dominant side of the cloth, and sateen the weft-dominant side on the other face of the fabric, the term satin is generally used to describe this structure.
In the May blog we also applied the rules to a 5-shaft straight draw, which gave us possible steps of 2 and 3, and we saw why it is not possible to have a true satin on 6-shafts. But, with an 8-shaft loom, it is possible to weave 7-shaft and 8-shaft satins. Here is how:
|
Rules |
Example for 7-shaft satin |
Example for 8-shaft satin |
|
Start with a straight draw for n number of shafts, with n at least 5 |
1, 2, 3, 4, 5, 6, 7 |
1, 2, 3, 4, 5, 6, 7, 8 |
|
Do not use a step number of n because it wouldn’t allow any threading |
Step cannot be 7 |
Step cannot be 8 |
|
Do not use a step number of 1 or (n - 1) since it wouldn’t change the straight draw |
Step cannot be 1 or 6 |
Step cannot be 1 or 7 |
|
The step number cannot have a common factor (mathematically) with n |
2, 3, 4, and 5 do not have a common factor with 7 |
2, 4, 6 are or have common factors with 8 |
|
The remaining integers can be used as steps |
Step of 2, 3, 4, and 5 are possible steps |
Step of 3 and 5 are possible steps |
Compare the drawdowns below of a 5-shaft satin (blue warp, green weft), also shown in last month blog, with the 8-shaft satin (red warp, gold weft), both with a step of 3; the sateen side is first, followed by the satin side:

Click here for the full-sized draft (a PDF will open in a new window).

Click here for the full-sized draft (a PDF will open in a new window).
The floats on a satin are always one thread less than the number of shafts used; thus, a 5-shaft satin has floats that are 4-thread long while an 8-shaft satin has floats that are 7-thread long. Whether the floats are too long depends on the sett, which in turn is related to the size of the thread, but generally it means that thin threads are best; in order to have the two sides show more of the weft or of the warp, we set the warp more closely than we may for a balanced twill. For example for a silk blend with a plain weave sett of 60 epi, the calculated setts for a balanced will, a 5-shaft satin and an 8-shaft satin are 80, 86 and 96 epi respectively.
It is possible to weave a satin by threading a straight draw and obtaining the treadling by applying the step to the tie-up. Here is a comparison of two 5-shaft satins (sateen side), using a step of 2; the black warp is identical to the one we saw last month, the pink warp is threaded as a straight draw, with the steps shown in the tie up. When a straight draw is treadled as a straight draw, a 1 / 4 straight twill appear; when a satin threading is treadled as a satin, a 1 / 4 straight twill also appears.

Click here for the full-sized draft (a PDF will open in a new window).
You can see that the structures of the two satins are the same. So, apply the step to the threading or to the tie-up / treadling depending on your preference.
In the last blog we also said that a satin is not possible on four shafts. Applying the same step rules to 4 shafts, we see why we need at least 5 shafts to weave a satin:
|
Rules |
No 4-shaft satin |
|
Start with a straight draw for n number of shafts |
1, 2, 3, 4 |
|
Do not use a step number of n because it wouldn’t allow any threading |
Step cannot be 4 |
|
Do not use a step number of 1 or (n - 1) since it wouldn’t change the straight draw |
Step cannot be 1 or 3 |
|
The step number cannot have a common factor (mathematically) with n |
2 is a factor of 4 |
|
The remaining integers can be used as steps |
No possible steps left! |
However, with 4 shafts we can weave a false satin, a 1/3 broken twill. As in the satin, we usually weave the weft-dominant side up; also as in a satin, we can break the twill either in the threading or in the treadling. Compare the drawdown of the 1/3 broken twills with the 5-shaft satins of the previous drawdown. On 4 shafts, more warp shows on the weft-dominant side and more weft shows on the warp-dominant side; but the effect is similar. The 4-shaft 1/3 broken twill has also the advantage of having shorter floats, 3, rather than 4 in the 5-shaft satin.

Click here for the full-sized draft (a PDF will open in a new window).
And here are the fabrics; the weft-dominant and the warp-dominant sides of the 1/3 broken twill:

The top of the scarf below, shown on the left, is weft-dominant, but there are also warp-dominant satin blocks; conversely, the right side, the bottom, is warp-dominant but with weft-dominant sateen blocks. When we combine satin blocks in this way we obtain damask; similarly, combining false satin blocks produces false damask. That will be the topic of my next blog.

Please email comments and questions to