| To Float or not to Float |
Marcy Petrini
April, 2023
Whenever I teach, the question of floating selvages invariably comes up. When our weft doesn’t catch the warps at the edge, what can we do?
One solution offered by weavers is to place the shuttle over or under the first and last warp thread with every pick. This is not a very efficient way to weave. On the other extreme are those who always use floating selvages. When they are not needed, this is not the most efficient way to weave either, and it may not give us the best edges.
Floating selvages are warp threads that are NOT threaded through the heddles but are sleyed in the reed to space them correctly. Then, when the shed is opened, these warp threads “float” between the top and the bottom of the shed as show in the picture below.

In weaving, we enter the shed over the floating selvage, and we let the shuttle travel on its race; it will end up below the floating selvage on the other side. “Over, under” is a good way to remember. A one-thread plain weave selvage is formed. We could do “under, over” but it is easier to start over as the shuttle ends up under automatically.
Because the take-up of the floating selvages is generally different than that of the rest of the fabric, tension problems at the selvages can result. To avoid this, it’s best to tension the floating selvages separately. I hang them from the back beam as shown below. Old film canisters work well, but they are becoming rare. Weighted bobbins from kumihimo braids work even better, easy to unroll the threads as the warp is advanced.

How to Determine if Floating Selvages Are Needed
In the summer 2014 issue of Shuttle Spindle & Dyepot, in my “Right from the Start” article I described the circumstances when the outer warp threads get caught by the weft and when they don’t. I used the edge warp and weft yarns on a simple loom to describe the various situations. If you are comfortable with drawdowns, however, they can be used as well.
Below are guidelines for looking at the drawdown to determine if floating selvages are needed. The process is easier to understand visually, so examples follow.
- The drawdown should have two complete repeats of the threading and treadling, with any balancing threads or motifs, and picks. It doesn’t matter whether the drawdown is rising or sinking shed.
- Choose a side from which the weft enters the shed; the pick will travel toward the other side.
- On arrival, the weft will be caught by the warp if it encounters it as the last warp thread of the pick OR as the first warp thread of the subsequent pick.
- If caught, proceed to the next pick until the entire treadling sequence is tested, ending with the start of the second sequence.
- If the weft is not caught at some point, start over with the weft entering from the opposite side.
- Repeat steps #3 and #4. If the weft is still not caught, floating selvages are needed.
Plain Weave Example
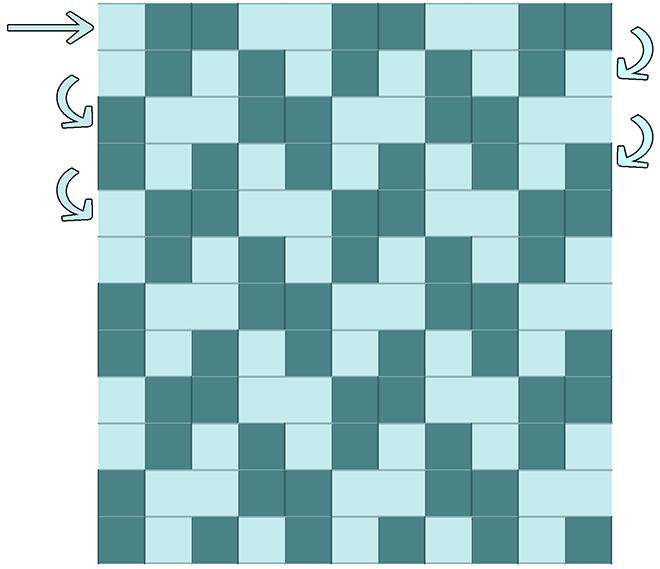
We know that plain weave does not need floating selvages because every weft is caught by the warp at the end. Below is the drawdown of plain weave with a dark blue warp and a light blue weft. This is how we can tell from the drawdown that floating selvages are not needed:

The weft enters the shed on the right as shown by the straight arrow; when the weft exists and enters the next shed on the left, we have warp - weft. At the end of the second pick and the beginning of the next, we have weft - warp. Both picks are successful, no floating selvages are needed.
Straight Twill Example: Reversing the Direction of the Weft
In the drawdown of the straight twill below, the warp is green, the weft is yellow. There are four treadling steps, each of which will need to be tested to determine whether floating selvages are needed.

We again enter the weft on the right. As it exists, we find weft – weft. The warp doesn’t catch the weft as shown by the red arrow.

Before we decide on floating selvages, we can reverse the direction of the first pick by starting on the left as shown by the straight arrow

We obtain warp – weft, weft-warp, etc. at the selvages for the entire sequence, four picks, concluding at the beginning of the next repeat, as shown by the curved arrows.
No floating selvages are needed.
For the straight twill and twills derived from it, there is a useful rule: start the threading with an odd shaft and end it with an even shaft, or vice versa, then enter the shuttle on the side of the warp where the first thread is down. From the example above, we see that when we follow the rule, no floating selvages were needed.
Pointed Twill Example: Floating Selvages Needed
Below is the drawdown for the pointed twill. The warp is burgundy, the weft pink. There is a thread on shaft 1 to balance the threading repeat. The treadling has six steps.

Starting on the right, we encounter weft – weft on the second pick.

If we start from the left, we also encounter weft – weft on the second pick,

Sometimes omitting balancing threads results in a good selvage. The drawdown below shows the warp - warp we encounter when omitting the balancing thread on shaft 1.

Reversing the direction of the weft fails at the 4th repeat.

Floating selvages are needed.
Broken Twill Example: Modifying the Twill
A broken twill is a straight twill where the threading sequence has been modified to avoid the straight twill line. In the drawdown below, the break occurs between shafts 3 and 4. This results in the threading starting and ending with odd shafts, 1 and 3 respectively. Not surprisingly, floating selvages are needed, even if we start where the first thread is down.


We can, however, eliminate one thread, so that the threading starts on an odd shaft (1) and ends on an even shed (4)

We can see from the drawdown below that the problem is solved.
No floating selvages needed.
Specific to the broken twill, we could put the break between shafts 2 and 3, thus maintaining the start and finish with an odd (1) and even (4) shaft.
In general, besides changing the edges of a twill, adding a straight twill repeat at the beginning and end of the pattern may work in avoiding floating selvages. This gives better results with twills based on a straight twill than those on pointed twill, but the class of this structure is so varied that it is worth considering with a drawdown.
When Floating Selvages Are Not Needed: Rectangular Float Weaves
Rectangular float weaves include grouped weaves like huck, unit weaves like Bronson lace, canvas weaves and a variety of other structures that are based on plain weave.
Most often these weaving structures include threading for plain weave along the length of the fabric, obviating the need for floating selvages.
Below is an example of huck lace. The plain weave selvage is threaded on shafts 1 and 2. No floating selvage needed.

Still unsure?
For planning purposes, I like to determine whether I need floating selvages before I start warping. This may be because I am using the width of the loom or I have limited yarn, so I may have to plan for the floating selvage threads.
With some structures, however, it can be confusing to determine from the drawdown whether floating selvages are needed or not; this includes long treadling sequences and some weaving structures with two wefts.
In these cases, I dress the loom without floating selvages. Then I treadle the sequence until the weft is not caught, or I complete the entire repeat plus the first pick of the second. If no floating selvages are needed, I am ready to weave.
If the weft doesn’t get caught with one of the picks, I try reversing the direction of the shuttle. If that doesn’t work, I add floating selvages. Since they are tensioned separately, it is actually easier to add them after the rest warp is tied on. Then I am ready to weave.
Use floating selvages on both sides of the fabric, even if only one side is needed. The two edges of the fabric will look the same and thus more even if they are treated the same way.
Happy weaving!
Marcy