10/2 Cotton Warp on a Rigid Heddle?
Marcy Petrini
March, 2020
In January I wrote about advice that I offered my student who had used a 10/2 cotton warp on a rigid heddle loom sett at 12 and found that her fabric was stiff and not very drapeable.
After I wrote the blog, I kept on thinking about the problem. What if somebody had realized that the sett of 12 for the 10/2 cotton was too open, after the rigid heddle was warped? What weft could I use for a successful project? I had to try it.
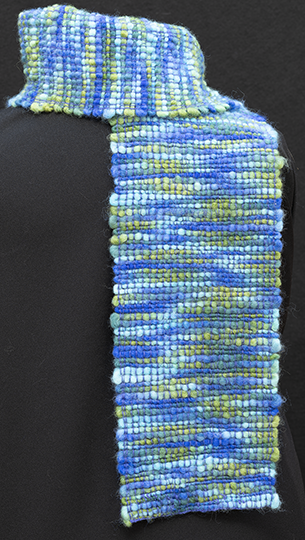
I dressed my rigid heddle for an 8” scarf with 10/2 mercerized cotton from Lunatic Fringe, color blue purple # 5, sett at 12. Then, my question was: what do I have in my stash that may work?
I did look at some wools that I have, but they were all too small. I found some lattice yarn that would work size-wise, but it was too heavy, and also scratchy. Then I found the perfect yarn, single spun think and thin, with the bonus of being variegated in shades of blues and green; it is “Bolero” by Lion Brand Yarn, 100% wool, 3.5 oz is 55 yards, and it wraps at 4 threads per inch, with some variability because of the thick-and-thin nature of the yarn.
Here is the scarf; it weights about 4 oz, a bit more than I like, but it is flexible and drapeable. It would have been even better if I had not beaten it as hard as I did, because the wool fulled in washing; leaving more space between shots would have resulted in a lighter scarf.
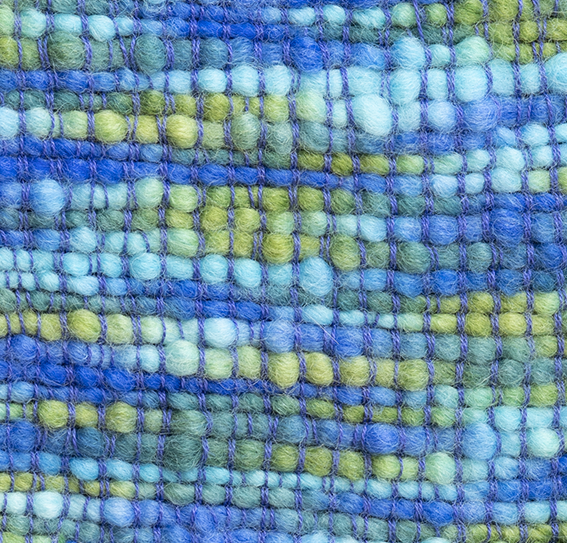
A close up of the fabric shows that pairs of warp ends snuggled together, but that did not affect the integrity of the cloth.
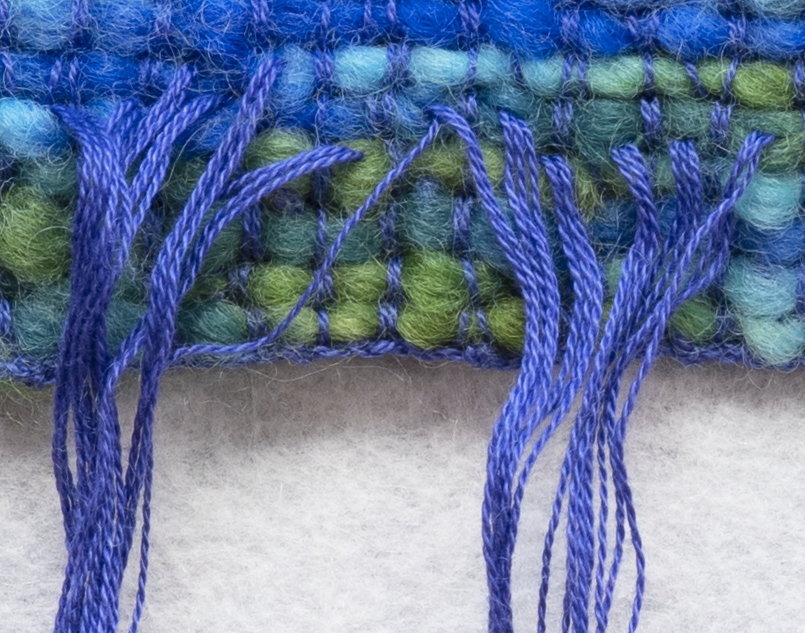
I generally hem stitch scarves (and most everything else); even if I plan on twisting fringes, the hem stitch holds the weft in place as I twist. When I use a larger weft, I use the warp to hem stitch, as I did here.

Once off the loom, after the hemstitching, I realized that those warp ends would make spindly fringes, a bad contrast to the lofty weft-dominant scarf. So, I wove back into the fabric all the warp ends, 96 ends on each side. With a glass of bubbly, by the fire on a rainy night, it took no time to do the job.
Here is the untrimmed end of the scarf. Once trimmed, the warp ends don’t show, as can be seen in the previous picture.
I am not sure what I would have done if I didn’t have the Bolero on hand, but solutions to weaving problems always seem to appear. I am sure there are lots of possible wefts for this warp, this just happened to be one that was handy. But the weft needs to be a lofty, fat yarn, preferably beaten lightly to make a good scarf.
Happy Weaving!
Please email comments and questions to marcypetrini@gmail.com.
A Color and Structure Gamp
Marcy Petrini
February, 2020
I was reading the book Frances L. Goodrich’s Coverlet and Counterpane Drafts by Barbara Miller and Deb Schillo and I was struck by the variations of the counterpanes which they describe in Chapter IV. I thought of counterpanes as square of a structure surrounded by stripes; some, indeed, are, but others are not squared, areas vary in size, and some others are actually called dimity, which usually have stripes of textures, also as a result of changes in structure.
Counterpanes started out, the authors say, as white summer bedcovers, but the drafts were also used for other household items and color later added. Unfortunately the subtlety that counterpanes are actually a combination of structures and not just a bedcover (or a quilt!) seems to have missed the etymologists; contemporary dictionaries and photos of counterpanes pretty much show the use as a synonym of any bedcover.
I was particularly drawn to Sarah Nelson’s Draft # 6 (page 134-135) “Huckeyback and twilled”, which reminds me of a structure gamp. The variation in this sample is both in the threading – left hand and right hand straight twill and huck – and in the treadling, to get blocks of the various combinations.
I promised myself that I would weave a counterpane and a dimity from the book “one of those days”, but I am not sure how I went from that sample to this color-and-structure gamp, I guess my mind meandered…. It is neither a dimity nor a counterpane, but fun nevertheless.
I made the scarf 8” wide, 2” each of #5 red, #5 red purple, #5 purple, and #5 purple blue, 10/2 cotton from the Lunatic Fringe, sett at 24 epi; each color stripe is separated by 2 black 10/2 cotton threads doubled. The #5 designation in the yarns is from the Munsell color system, indicating the midpoint in value for a given hue.
The drawdown below shows the straight draw threading with four treadlings: plain weave, straight twill, crepe, and broken twill. The four colors were used for each treadling, again separated by 2 doubled black threads.

Click here for the full-sized draft (a PDF will open a new window)
Here the four sections:
Plain weave

Straight twill

Crepe

Broken twill

Squares within squares, inspired by the counterpanes.
At the end of the broken twill, I reversed the structures and colors, starting with the broken twill and the purple blue.
And here is the scarf.

Who knows where the next inspiration will come from! But those counterpanes and dimities are calling.
Happy Weaving!
Please email comments and questions to marcypetrini@gmail.com.
Looking Forward to 2020!
Marcy Petrini
December, 2019
I hope everyone is having a wonderful holiday season. I love visiting with family and friends this time of year, the fun parties, and the bubbly tastings, but I must admit that I get frustrated that not much handwork gets done. I keep on reminding myself that there is a reason why traditionally women put up their weaving and spinning for the holidays.
But this leads me to reflect on how much really did get done this past year and even though weaving, spinning, knitting, etc. are slow, and I don’t do it as much as I would like, the work gets completed. In fact, I have a drawer full of finished projects waiting to be photographed… I am not the only one that has gotten behind. But Terry (Dwyer, my husband who photographs all of my pieces) has a good excuse: new camera for Christmas!
Do yourself a favor, take a few minutes and reflect on what handwork you have accomplished in 2019. It’s likely more than you remember. Use a list, a spreadsheet, or a table like the one below, and edit to fit your needs. Fill it; looking back also allows you to think about your direction for the future. Are there techniques you want to try? Are there projects so successful you want to explore the topic more? Are there projects that were not as successful – what could you change them to make them better?
Here is the table filled with my favorite project of the year:
|
Project |
“Onde”, small shawl, 13” by 65” |
|
Technique |
Straight draw on 40 shafts |
|
Materials |
Warp: 20/2 silk, variegated greens |
|
Purpose |
To experiment with irregular motifs |
|
Assessment |
I tried this technique before, |
“Onde” means waves in Italian; here is the picture of the piece:

When counting, I see that I have finished 20 weaving projects, with 2 more on the looms, 5 knitting projects and 1 on the needles, 2 spinning projects and 1 being plied. I believe that, for me, quantity doesn’t always matter, but quality always does.
For 2020, I have 4 weaving project to complete for the Convergence® seminars and workshop I will be presenting, then I can go back to explore the irregular motifs of “Onde” above.
For spinning, I have joined the Shave ‘em to Save ‘em Initiative from the Livestock Conservancy:
https://livestockconservancy.org/index.php/involved/internal/SE2
I am plying the last of the Gulf Coast wool; next will be Shetland, 4 oz each. While I doubt that I will spin all the threatened breeds in the allotted time of 3 years, especially since I found out about it late, I still think it’s a worthwhile project to pursue. I plan to knit a blanket using strips or squares in different stitches for each breed, so I will know them apart, and that may take a long time. But saving these breeds is important, so whatever contribution any of us can make is worthwhile.
Now it’s your turn: what will 2020 bring?
Happy New Year!
and
Happy Weaving!
Please email comments and questions to marcypetrini@gmail.com.
Drapable Scarves on the Rigid Heddle
Marcy Petrini
January, 2020
I received an email from a knitting student from a long, long time ago (in a galaxy far, far away) asking for some help; she is just starting to weave on a rigid heddle, and she is not happy with her projects. She said that she used 3/2 mercerized cotton for warp and weft on her 12 dent heddle for a scarf and she felt that it was too heavy and not very drapable. She lives in a relatively warm climate, so she had thought a cotton scarf would be perfect for her winters. After she was done, she figured that the 3/2 cotton must have been too thick, so next she used a 10/2 cotton because she knows some weavers who use it for their scarves. She again used her 12 dent heddle. Her results were even worse, she said: she tried to avoid a flimsy, unstable fabric, but the weft packed so much that she ended up with a very stiff fabric. “What went wrong”? she asked, “What should I have done?”
For the first scarf: heavy, dense yarns make heavy, dense fabrics, which are appropriate for some uses. For the second scarf, we match the sett to the yarn, not the other way around. An open warp sett for a thin yarn is how we make weft-faced fabrics, for example heavy and durable rugs, not scarves.
Here are some ideas to answer my students “What should I have done?”
I agree that 3/2 cotton is too heavy for a scarf; I use it successfully to make table runners and place mats. In the way of a comparison, the plain weave scarf my student made, with a finished width of 8” wide and length of 60”, weighs 4.1 oz; a comparable size plain weave scarf woven with 10/2 cotton sett at 20 epi weights 2 oz., sett at 22 epi weighs 2.2 oz. Big difference in weight.
With a rigid heddle, we have to use the sett of the heddle, and 12 is about the upper limit possible because of mechanical reasons. But there are plenty of yarns that can be sett at 12 and give wonderful results. We need yarns that are not heavy or dense: wool, for example, wool and silk blends, or one of the new light weight synthetic yarns.
Here is one of my scarves with sock yarn for warp, 75% superwash merino and 25% nylon, and polyester hair yarn for weft; it weighs less than 3 oz. and it’s fluffy and fun.

Sometimes we are reluctant to use handspun on our shaft looms: we may be afraid that the warp will stretch too much, or that the yarn is not strong enough for the tension needed and it will break; and there is also a lot of loom waste. The rigid heddle is perfect for that handspun: the lesser tension is less likely to cause the warp to stretch or to break, and the loom waste is just enough for fringes on a scarf.
I wove a scarf with my handspun, commercially dyed, 65% superwash merino and 35% silk for warp and weft. The scarf weighs less than 3 oz. and it is warm. This scarf was the topic of the February 2019 blog, but here it is again.
What if I have a thin yarn that I want to use on my rigid heddle? Here is a possible solution:

The warp of this scarf is a ribbon, “Gedifra”, 100% cotton which wraps at 6 wpi; the weft is Jems Luxe Fibers, “Nimbus”, 72% Kid mohair, 28% silk, which wraps at 40 wpi. The close set of 5 epi allows the scarf to show off the variegation of the ribbon; with the thin weft, the scarf is light weight and drapable. The mohair is an added bonus, giving the scarf a halo.
The weft of the scarf below also wraps at 6 wpi; it is hand-dyed silk Sari ribbon by the Wonderland Collection; the warp is 5/2 silk from RedFish Dyeworks; sett at 12, the warp was open enough to show the weft, but the scarf would be heavy and not very flexible if I had used only the ribbon for weft. To avoid that problem, I wove two picks of silk between each pick of ribbon; one pick of silk may have been enough, but I wanted the ribbon to fall on alternate sheds.

The rules for setting a warp are the same whether we weave on a shaft loom or a rigid heddle. I won’t repeat them here, I wrote about them in my July 2019 blog. If you are unsure about what the weight of the project will be, calculate it by using the dimensions of the scarf and the weight per unit length given by the manufacturer, and double it for the weft (make sure to be consistent with units, that is, don’t mix cm with yards).
Keep those scarves light and drapable! Happy Weaving!
Please email comments and questions to marcypetrini@gmail.com.
From Four Shafts to Eight Shafts
Marcy Petrini
November, 2019
This month I gave a program on “From Four Shafts to Eight-Shafts” to my guild, the Chimneyville Weavers and Spinners Guild. I have presented seminars and workshops in the past, I wrote a monograph on the topic, and I wrote briefly about one aspect of it in my May 2016 blog. But whenever I am to present a topic, I like to rethink of it because difference circumstances require different presentations and, for a short program, it’s best to address the big picture with some examples to clarify.
I like to think of the transition from four shafts to eight – or more – as falling into four broad categories: 1) structures that can be simply extended – both the threading and the treadling; 2) structures that generally require some adjustment of the extension, to avoid too long floats; 3) structures that are only possible with more shafts; 4) combinations of structures, sometimes called hybrid.
Extending the Threading and Treadling from Four to More
Structures that fall in this category are many of the grouped weaves, which form blocks, with one warp and one weft (the “lacey weaves”), and the tied-unit weaves which form blocks with one warp, a background weft and a pattern weft; summer and winter is the only one on four shafts (discussed in the 3rd section).
Example: Spot Bronson
On four shafts, there are three blocks, each made up of shaft 1 plus a pattern shaft. Blocks can be as long as we wish, limited by the float length, which, in turn depends on sett. Blocks cannot be combined as the float would just be extended. On eight shafts, there are seven blocks, and they can be arranged to form motifs as long as adjacent blocks are not combined.
From the drawdowns we see that the structure has been simply extended to 8 shafts with no changes. Plain weave across the fabric is treadled 1 vs. all other shafts; each block is treadled by covering with weft the warp ends on shaft 1 and plus the pattern shaft; on a sinking shed loom, we lower shaft 1 and the pattern shaft; on a rising shed loom, we lift all the pattern shafts except the one to be covered; that is, to weave block A threaded on shaft 2, we lower shafts 1 & 2 or we raise 3 & 4 on 4 shafts or 3 & 4 & 5 & 6 & 7 & 8 on 8-shafts.

Spot Bronson on 4 shafts
Click here for the full-sized draft (a PDF will open a new window)

Spot Bronson on 8 Shafts
Click here for the full-sized draft (a PDF will open a new window)
This simple extending allows for more design options.
Extending the Structure from Four to More with Some Adjustments
Structures that fall into this category are the twills and the supplementary weft weaves derived from twills, for example overshot (see May 2016 blog).
Example: Straight Twill
Twills are structures with one warp and one weft that forms staggered floats. A balanced straight twill, shown below, is the simplest on four shafts, balanced meaning that with every pick, two shafts are up and two shafts down, also called a 2/2 twill. Because every pick follows the same rules, the 2/2 twill is called regular and forms the characteristic slanted motif.

Straight Twill on 4 shafts
Click here for the full-sized draft (a PDF will open a new window)
With 8 shafts, we can simply extend the threading and treadling as shown below, but this results in 6-thread floats, weft-floats on one side, warp-floats on the other. Whether a 6-thread float is acceptable depends on the sett, but there are more options that result in more visually pleasing twills.

Straight Twill Threading on 8 shafts
Click here for the full-sized draft (a PDF will open a new window)
There are three options to adjust this twill: 1) change the tie-up to anchor the floats, maintaining the balanced twill; 2) change the tie-up to anchor the floats, but produce an unbalanced twill (similar to the 3/1 twill on 4-shafts); 3) change the tie-up to anchor the floats, so that the picks do not follow the same rule; this is an irregular twill, sometimes called fancy.
Below is a 2/1/2/3 straight twill, which is balanced: with every pick, 4 shafts are up (2 and 2) and 4 shafts stay down (1 and 3).

2/1/2/3 Straight Twill
Click here for the full-sized draft (a PDF will open a new window)
Below is a 3/1/2/2 straight twill which is unbalanced: 5 shafts are up (3 and 2) and 3 shafts are down (1 and 2).

3/1/2/2 Straight Twill
Click here for the full-sized draft (a PDF will open a new window)
Below is an irregular or fancy twill, which cannot be described by any sequence of up and down shafts, since each pick is different.

Irregular Straight Twill
Click here for the full-sized draft (a PDF will open a new window)
In each of these cases, the floats are never more than 3-threads long, making for a stable fabric.
Structures Requiring More than Four
There are three common groups of structures that generally require more than for shafts: satins, most tied-unit weaves, and most turned drafts from supplementary weft weaves. We will discuss these.
Example: 5-Shaft Satin
Satins require at least 5 shafts to be woven; they are unbalanced fabrics, one side predominantly weft-dominant, called sateen, the other warp-dominant, called satin. On four shafts, a 3/1 broken twill is sometimes called a false-satin because it resembles it, but in a true satin the floats are stitched or anchored intermittently with less pattern, especially with more shafts, which is why four can’t produce a true satin. (My May 2017 and June 2017 blogs are on this topic). With 8 shafts, we can have 7- and 8-shaft satins, in addition to 5.

Satin
Click here for the full-sized draft (a PDF will open a new window)
The first half of the drawdown above shows the sateen side, which is the way the fabric is usually woven, only one shaft at a time to lift; the bottom of this fabric will be the satin side. The second half of the drawdown shows the satin side up, facing the weaver as the fabric is woven; the bottom of this fabric will be the sateen side.
Satins can showcase special yarns, making for an almost solid surface; care must be taken, however, because they can be heavy, packing nearly twice as much yarn as plain weave for the same size fabric. Using thin threads and light weight fibers solves the problem.
Unit Tied-Weaves: Tied Lithuanian
We have already mentioned that summer and winter is a unit tied weave that can be woven on four shafts. But this group really profits from more shafts; in fact, there are so many options, that some don’t even have names, but they are called by their classification described below, made popular by Donna Sullivan in her book Summer and Winter A Weave for All Seasons. First we apply it summer and winter on 4 shafts.
|
Summer and Winter Example |
Classification |
|
Single |
# of pattern shafts per block |
|
Two-tie |
# of shafts used for ties |
|
Unpaired |
Paired = ties next to each other |
|
1: 1 ratio |
Ratio of |
By this nomenclature, summer and winter is called single because each block uses one pattern shaft, 3 in block A, 4 in block B, see drawdown below; two-tie since shafts 1 and 2 are the ties; unpaired because the ties alternate with the pattern shaft in each block; a 1:1 ratio since each block has two ties and two pattern shafts, even though each block uses the same pattern shaft twice.

Summer and Winter on 4 shafts
Click here for the full-sized draft (a PDF will open a new window)
From the drawdown we see that, in treadling, each block is woven with two pattern picks; the weft covers the threads on the pattern shaft and on one of the ties, then the other. In a sinking shed loom, the pattern shaft is lowered, in a raising shed loom, all other shafts are raised. The drawdown above is for a raising shed loom; to weave block A, threaded on shaft 3, the picks raised one of the tabbies, plus shaft 4, so 3 stays lowered to be covered.
In treadling, each pattern pick is followed by a tabby pick, treadled ties vs. pattern shafts; on 4-shafts that is 1 & 2 vs. 3 & 4; the tabby picks are not shown in the drawdown above, so the pattern is more obvious. This treadling is called “singles”, but there are more treadling options. (See RFTS in Shuttle Spindle & Dyepot #198 & #199, summer and winter 2019, respectively).
When summer and winter is woven on 8 shafts, it is still a single, two-tie, unpaired structure with a 1:1 ratio as shown in the drawdown below. As with 4 shafts, the tabbies are 1 & 2 vs. all pattern shafts; each block is woven with two picks, each tie-down shaft plus the pattern shaft, as in four shafts. Adjacent blocks can be combined on 4 and 8 shafts, but there are more options on 8 shafts.

Summer and Winter on 8 shafts
Click here for the full-sized draft (a PDF will open a new window)
With more than four shafts, each of the parameters in the classification can be changed and increased; for example, we can have more shafts per block, or more ties.
Below is the drawdown of an example: Tied-Lithuanian, which is described by this classification.
Double: two pattern shafts per block (3 & 4; 5 & 6; 7 & 8).
Two-tie: two shafts for the ties, 1 and 2.
Paired: the ties, 1 and 2, are next to each other.
1:2 ratio: each block has the two ties and four pattern shafts, two repeated for each block.
In treadling, a tabby shot follows each pattern pick, not shown in the drawdown. The tabbies are all odd shafts vs. all even shafts.
The drawdown shown below is for a raising shed loom, thus alternate shafts are raised in order to cover the block with weft. When treadling the blocks, the odd tie-down shaft, 1, is raised with the odd pattern shafts not in the block threading. That, is, to treadle block A which uses pattern shafts 3 & 4, the odd pattern pick lifts 1 & 5 & 7. The other pattern pick for block A lifts the even tie-down shaft, 2, plus the even pattern shafts, 6 & 8, not found in the threading of block A.

Tied-Lithuanian
Click here for the full-sized draft (a PDF will open a new window)
The treadling shown forms plain weave in the blocks not being woven, but blocks can be combined because the tie-down threads limit the floats.
Turned Drafts: Summer and Winter
We turn drafts by literally exchanging the threading with the tie-up/treadling, usually to avoid weaving with two shuttles. The supplementary weft becomes the supplementary warp. A drawdown that requires 6 treadles is turned into a structure requiring 6 shafts. Thus, most 4-shaft structures with a supplementary weft need more than four to be turned (an exception is Monk’s Belts).
Below is the drawdown of summer and winter on 4-shafts; it’s the same structure shown in the previous section, but this time the alternating tabbies are shown in the light green. There are six treadles needed to weave it, two tabbies (1 & 2 vs. 3 &4) and two treadle each for each block.

Summer and Winter
on 4 Shafts with Tabby
Click here for the full-sized draft (a PDF will open a new window)
Below is the drawdown of the turned draft; the block motifs are also turned. Six shafts are needed, two for the tied down threads, two each for the two blocks.
On 8 shafts, a 3-block turned summer and winter could be woven, by adding shafts 7 and 8 to form the additional block, alternating with shafts 1 and 2.

Summer and Winter Turned
Click here for the full-sized draft (a PDF will open a new window)
Combining Structures
We can think of our 8-shaft loom as being two looms: the front four shafts are one loom, the back four shafts another. Thus we can weave two structures together; the simplest way is to thread one structure on the front loom and another in the back loom in stripes, or the threading can alternate the two looms. Then we combine the treadling sequences.
While in principle this is easy to do, there can be some complications; in some cases, combining the two treadlings results in a sequence that requires more treadles that the loom has; in some instances, a skeleton tie-up may work, in others weaving the fabric upside down may make the skeleton tie-up more manageable.
Sometimes the combined treadling sequence is so long that weaving it can be daunting. Both of these cases are made much easier with a dobby, generally computerized now.
But a third complication can occur at the joints between one structure and the other, where the resulting floats are too long. Sometimes adjusting the floats results in a hybrid structure that is unique.
I use this method a lot in my work with more than 8-shafts with a computerized dobby. Sometimes the results are really fun, other times……
Happy Weaving!
Please email comments and questions to marcypetrini@gmail.com.
Page 13 of 28