|
Twill Blocks Tie-Up |
Marcy Petrini
August, 2024
It invariably happens that when I teach a topic, I come away with more ideas. I offered a seminar on blocks at Convergence® 2024 and as I was finishing the handout, I thought of things that I wanted to change.
One of the areas is twill blocks on eight shafts. In my monograph on eight shaft twills, I have taken a straight draw and wove the two halves as 1/3 and 3/1 broken twills, forming blocks, one block weft dominant, the other warp dominant and then reversed. We also call these twills false satins, so two blocks of false satins form a false damask.
Below is the drawdown and the fabric woven from it.
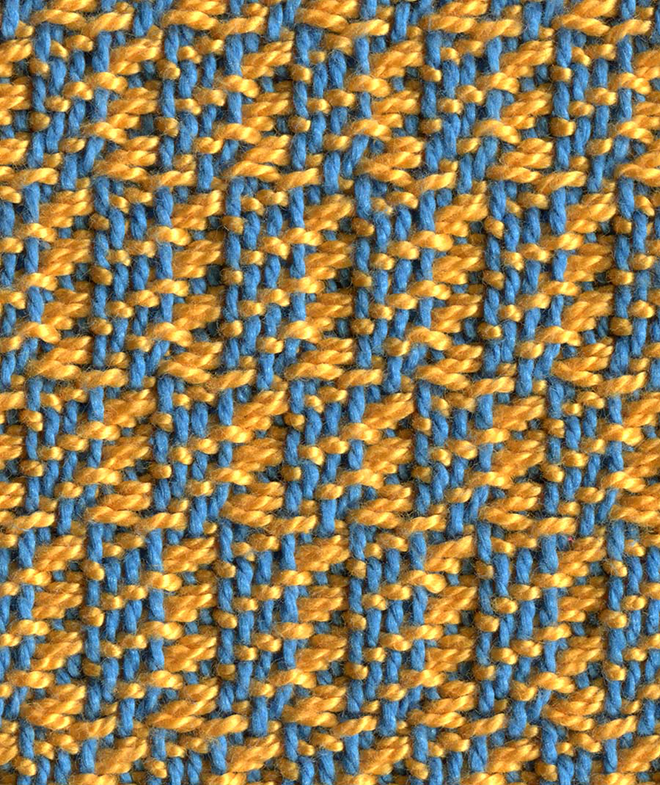
There are two lessons to be learned from these figures. We can see that they are formed with broken twills; they are false satin and not true satin blocks because the twill lines are still visible. A true satin has “the suppression of the appearance of diagonals” as defined by Emory (Emory, Irene. The Primary Structure of Fabrics. Washington, D.C.: The Textile Museum, 1980.)
The second lesson is that floats of a 1/3 and 3/1 twill should be three threads long for both weft and warp floats. In the above fabric and drawdown, I wasn’t careful and where the blocks meet, some of the floats carry over into the next block, sometimes resulting in a four-thread float.
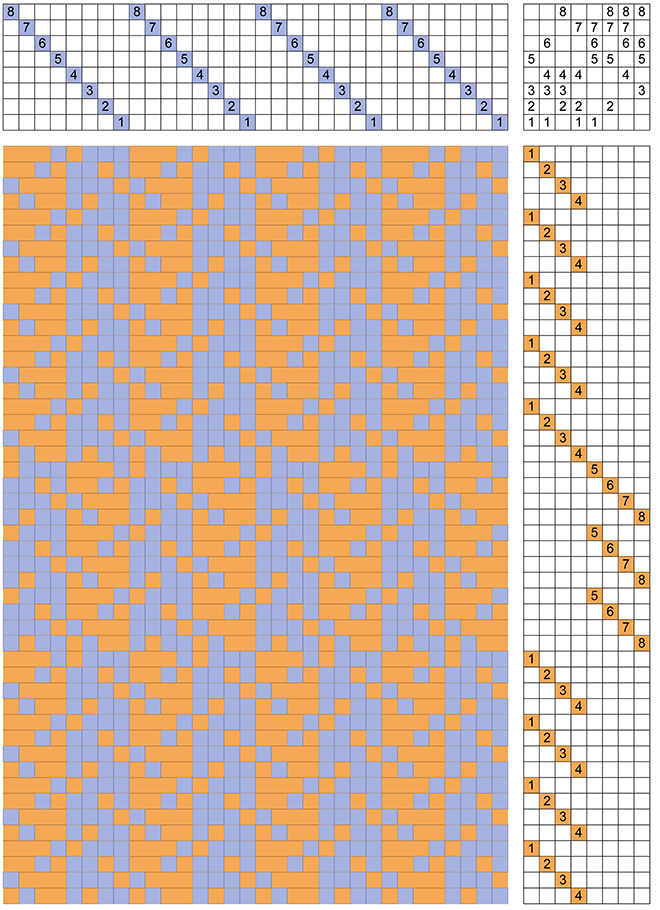
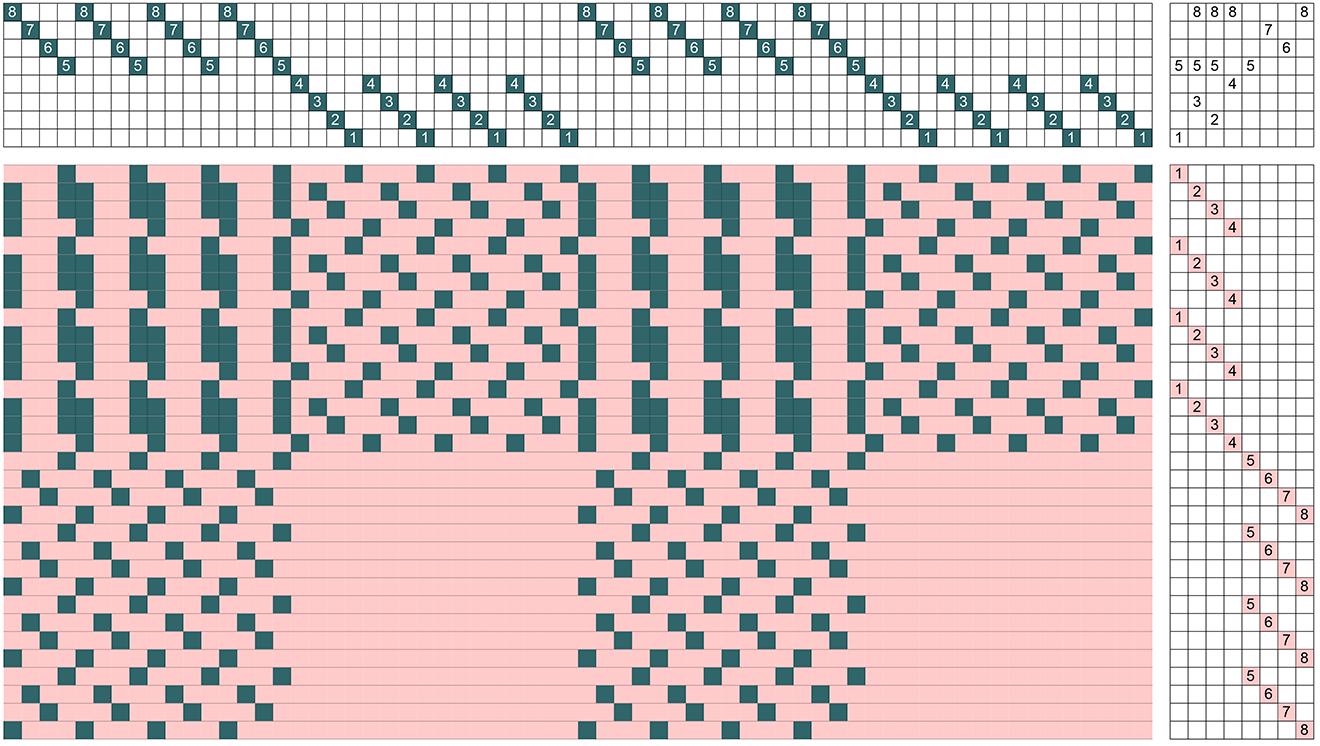
In some of the variations of this structure, Carol Strickler in her book (A Weaver’s Book of 8-Shaft Patterns) describes these blocks as having units, one on shafts 1 through 4 forming block A, the other on shafts 5 through 8 for block B. The same twill is used for both units and each unit can be repeated. The drawdown below is an example. Block A is formed with two repeats of the straight twill on four shafts; block B is the same configuration, but on the second set of shafts. The treadling is weaving the blocks to square, one weft dominant, the other warp dominant, and then reversing.
This drawdown also appears in my monograph, and it has the same problem as the previous one: floats continuing into the adjacent block.
Now, however, I want to weave this structure, so it’s time to think about making the floats the correct length. I could just copy the tie-up and treadling from Strickler’s book, but I want to understand how to manipulate the tie-up to achieve that goal. I have seen others just break the twill and not worry about the spill-over floats as I did. We can think about developing the correct tie up. (The next set of figures derive the drawdown; if you don’t want to follow it, see Figure 11, the final result.)
When I weave broken twills, I usually “break” the twill in the threading, between shafts 2 and 3. Thus, the resulting threading is 1, 3, 2, 4. When treadled as a 2/2 straight draw, this has the advantage of not needing floating selvages because of the odd vs. even edges in the threading.
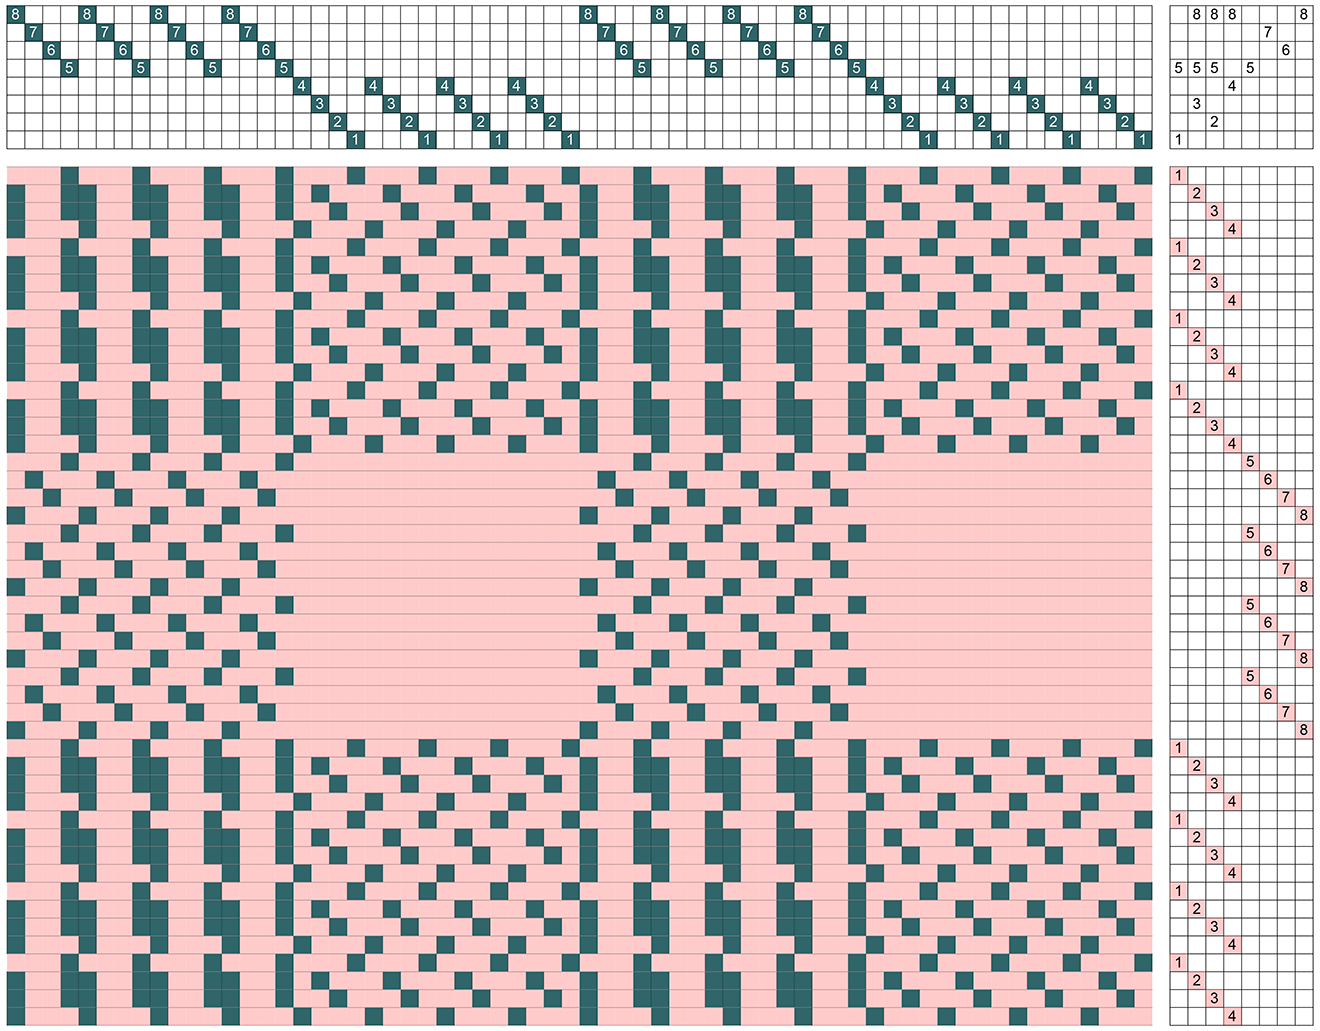
However, straight twill threadings are more versatile for twill blocks. Then the tie-up can be broken. I used the same 1, 3, 2, 4 which resulted in the next drawdown.
This portion of the tie-up and treadling weaves blocks A weft dominant.
We can repeat this tie-up for the second block; however, the weft-dominant tie-up and treadling for block B must occur when block A weaves the warp-dominant twill, as in the drawdown below:

The next step is to find a warp dominant tie up for the shafts 5 through 8. There must be three warp thread and one weft thread for each twill repeat. Warp threads in the warp dominant block B cannot be adjacent to warp threads at the edge of the weft dominant block A. It’s a bit like solving a puzzle.
I approach this tie-up by figuring out which shaft can be tied to which treadle, using the limitations described above.
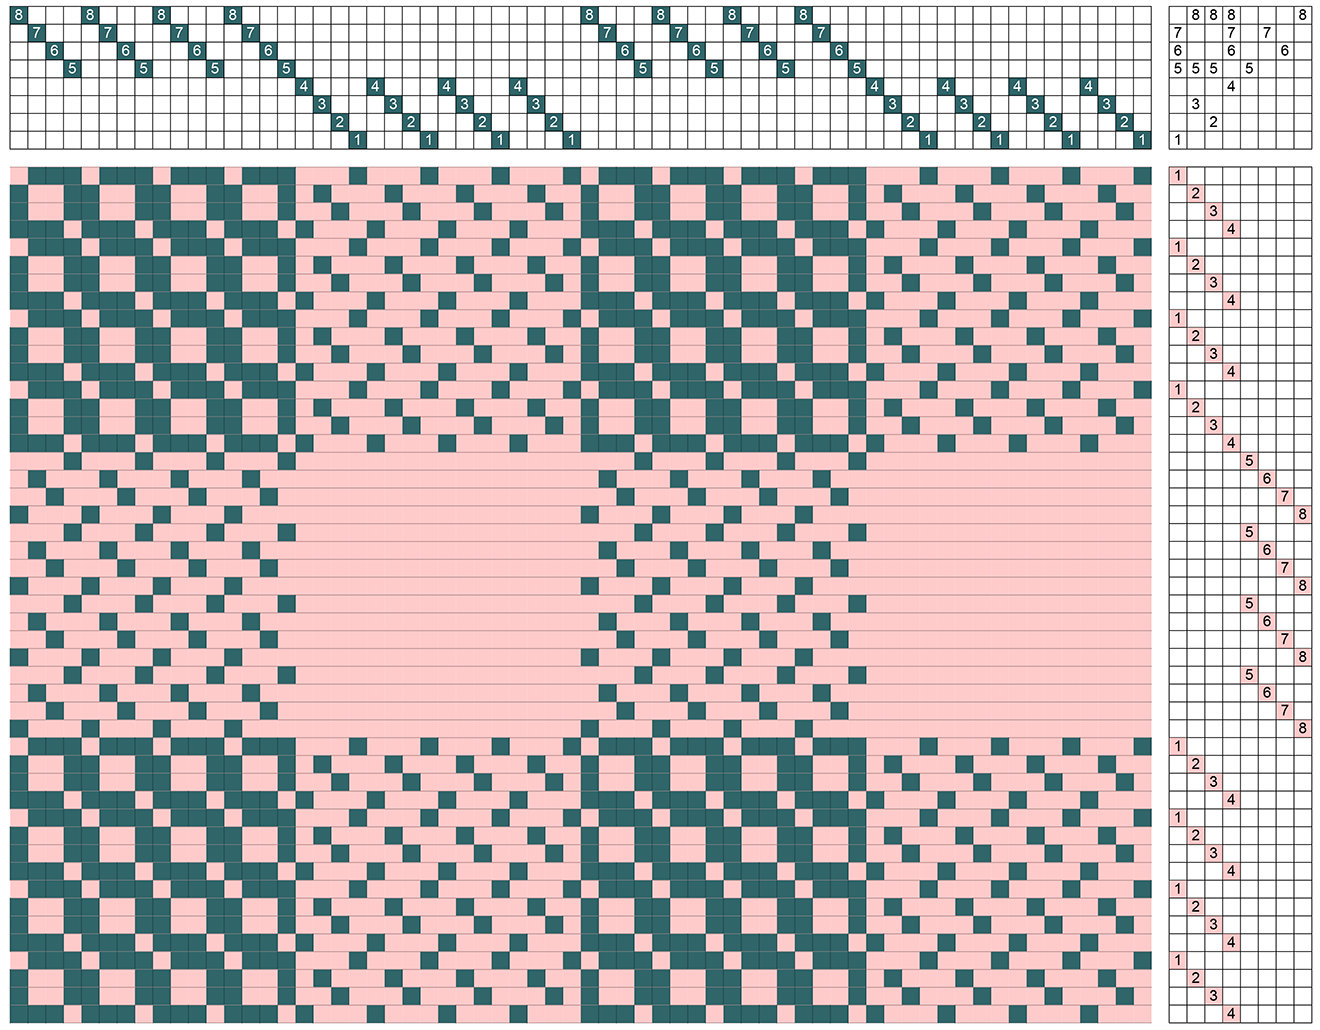
Shaft 5 can show warp with treadling step 1, 2 and 3, since the adjacent shaft 4 shows weft. Then treadling step 4 for shaft 5 will show weft, since shaft 4 shows warp. The drawdown is below:

We can use the same strategy on the other side of the block, with shaft 8. Shaft 1 shows warp with the first pick, and weft with picks two through four. Thus, shaft 8 must show weft on the first pick and warp for the remaining three, as shown in the drawdown below.
Next, I want to look at the bottom and the top of the warp-dominant block B where it meets the top and bottom of the weft-dominant block B. In order to see top and bottom I must extend the treadling steps 1 through 4.
For treadling step 4, shafts 6 and 7 must show warp since step 5 shows weft. For treadling step 1, shafts 6 and 7 must also show warp since step 8 shows weft.
Next, we need to fill in the treadling by following the rules: warp on shaft 6 for treadling step 3, in order to have a three-thread warp float. Similarly, warp on shaft 7 for treadling step 2.
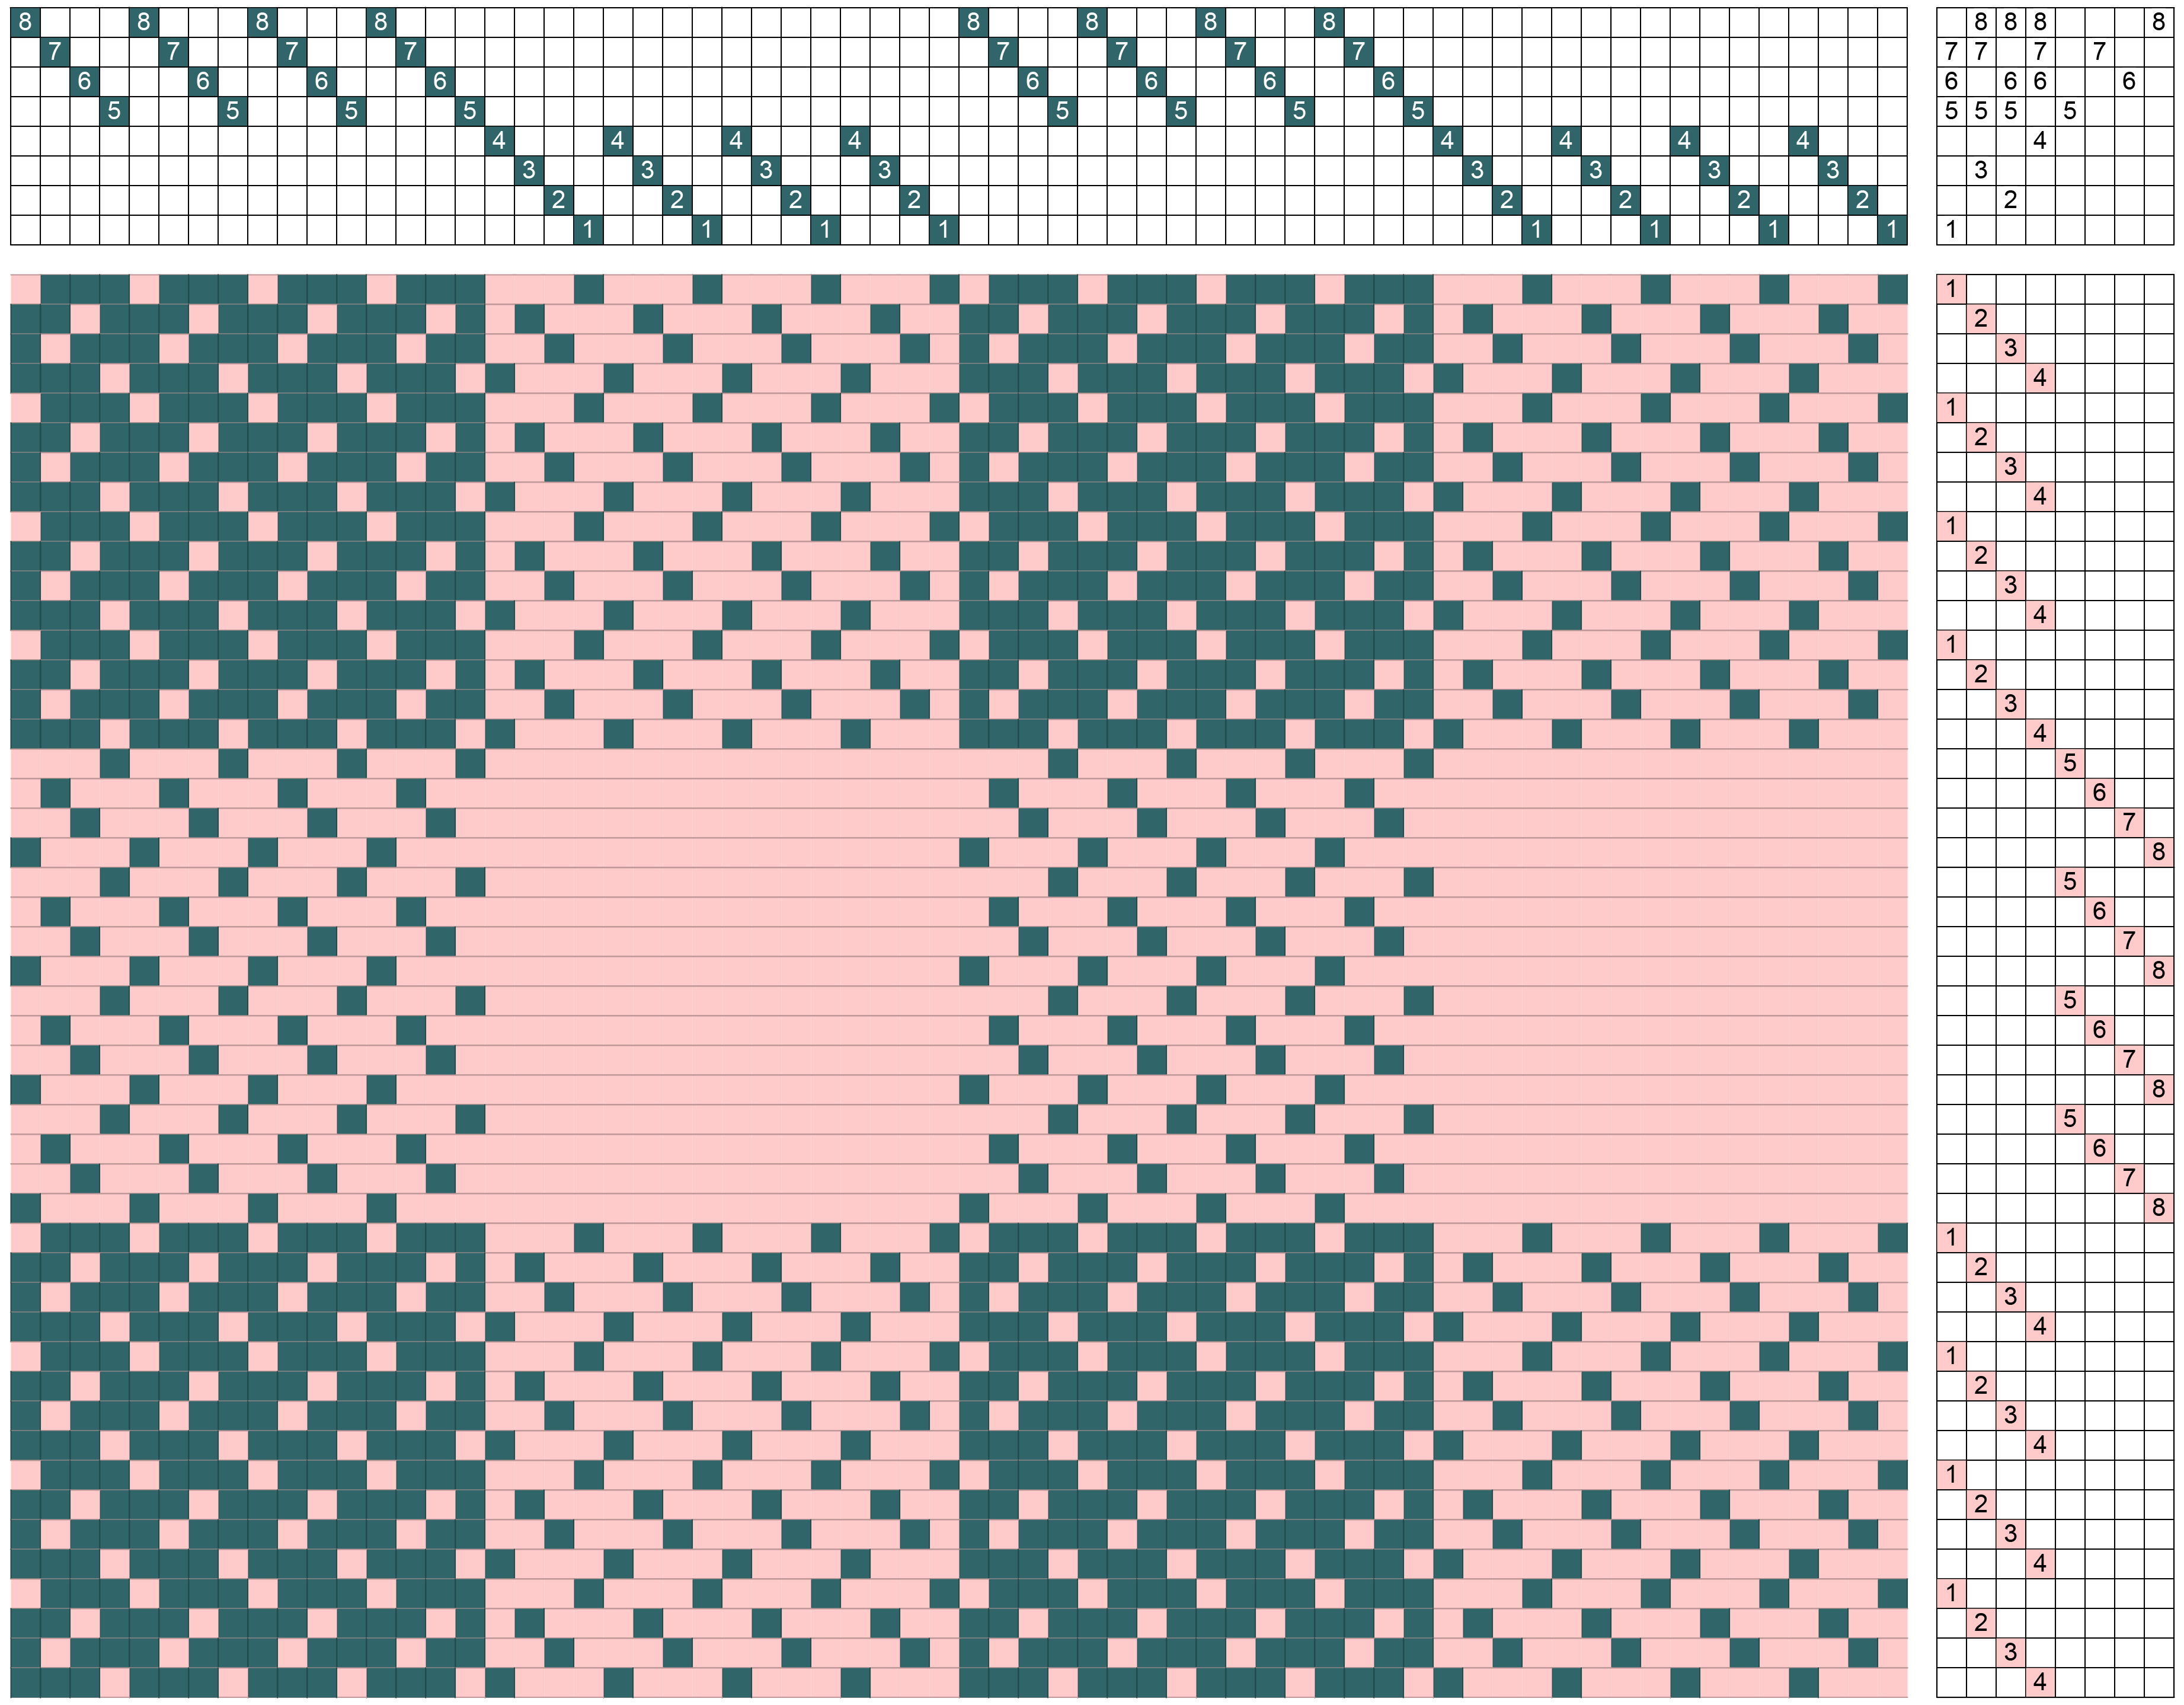
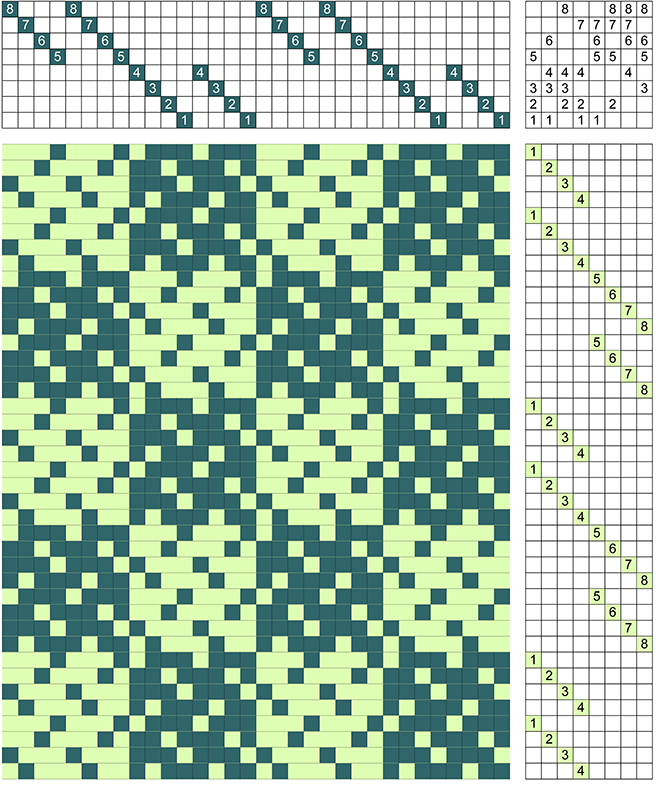
Our last step is to do the tie-up for warp-dominant block A, which we do in parallel to block B. To complete the drawdown, we repeat treadling steps 5 through 8 again. Below is the final drawdown.
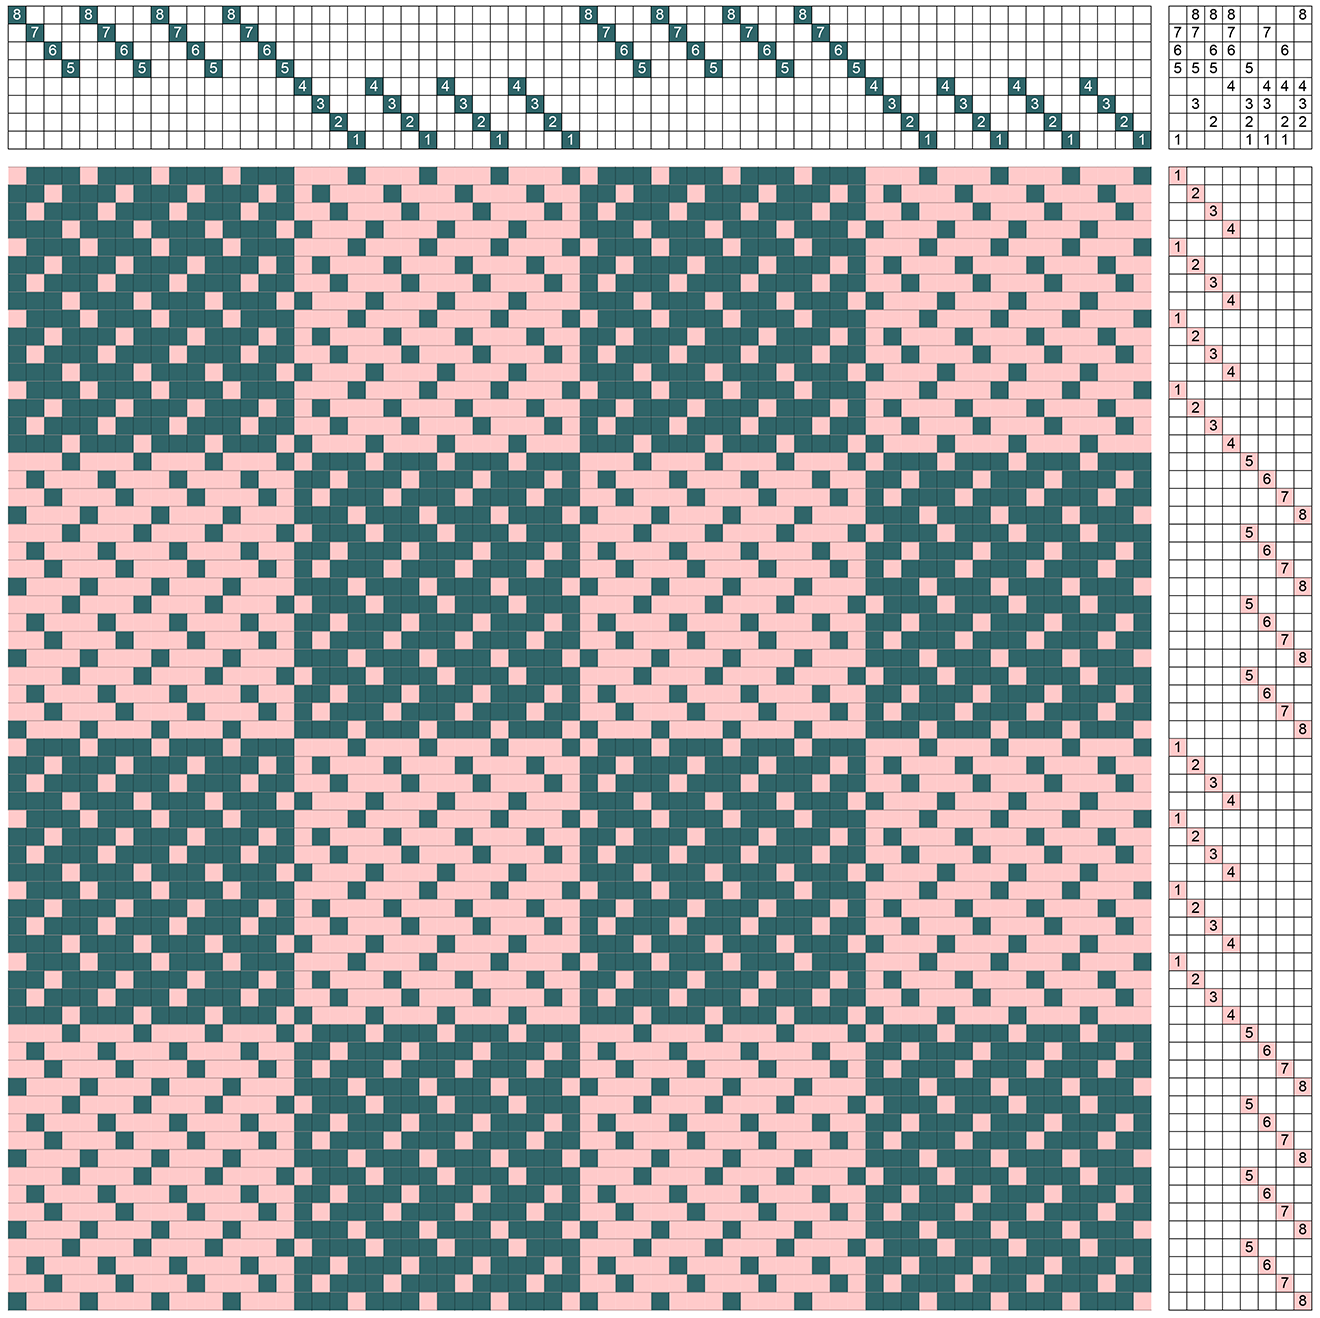
Done! To check that all the floats are never longer than three threads, I use the float analysis of the drawdown software and it confirms it.
Describing the process takes longer than to do the steps!
I figured that there is more than one way to treadle these twill blocks. I was curious what tie-up is used in Strickler’s book, so I did the drawdown exactly as it appears, shown below:
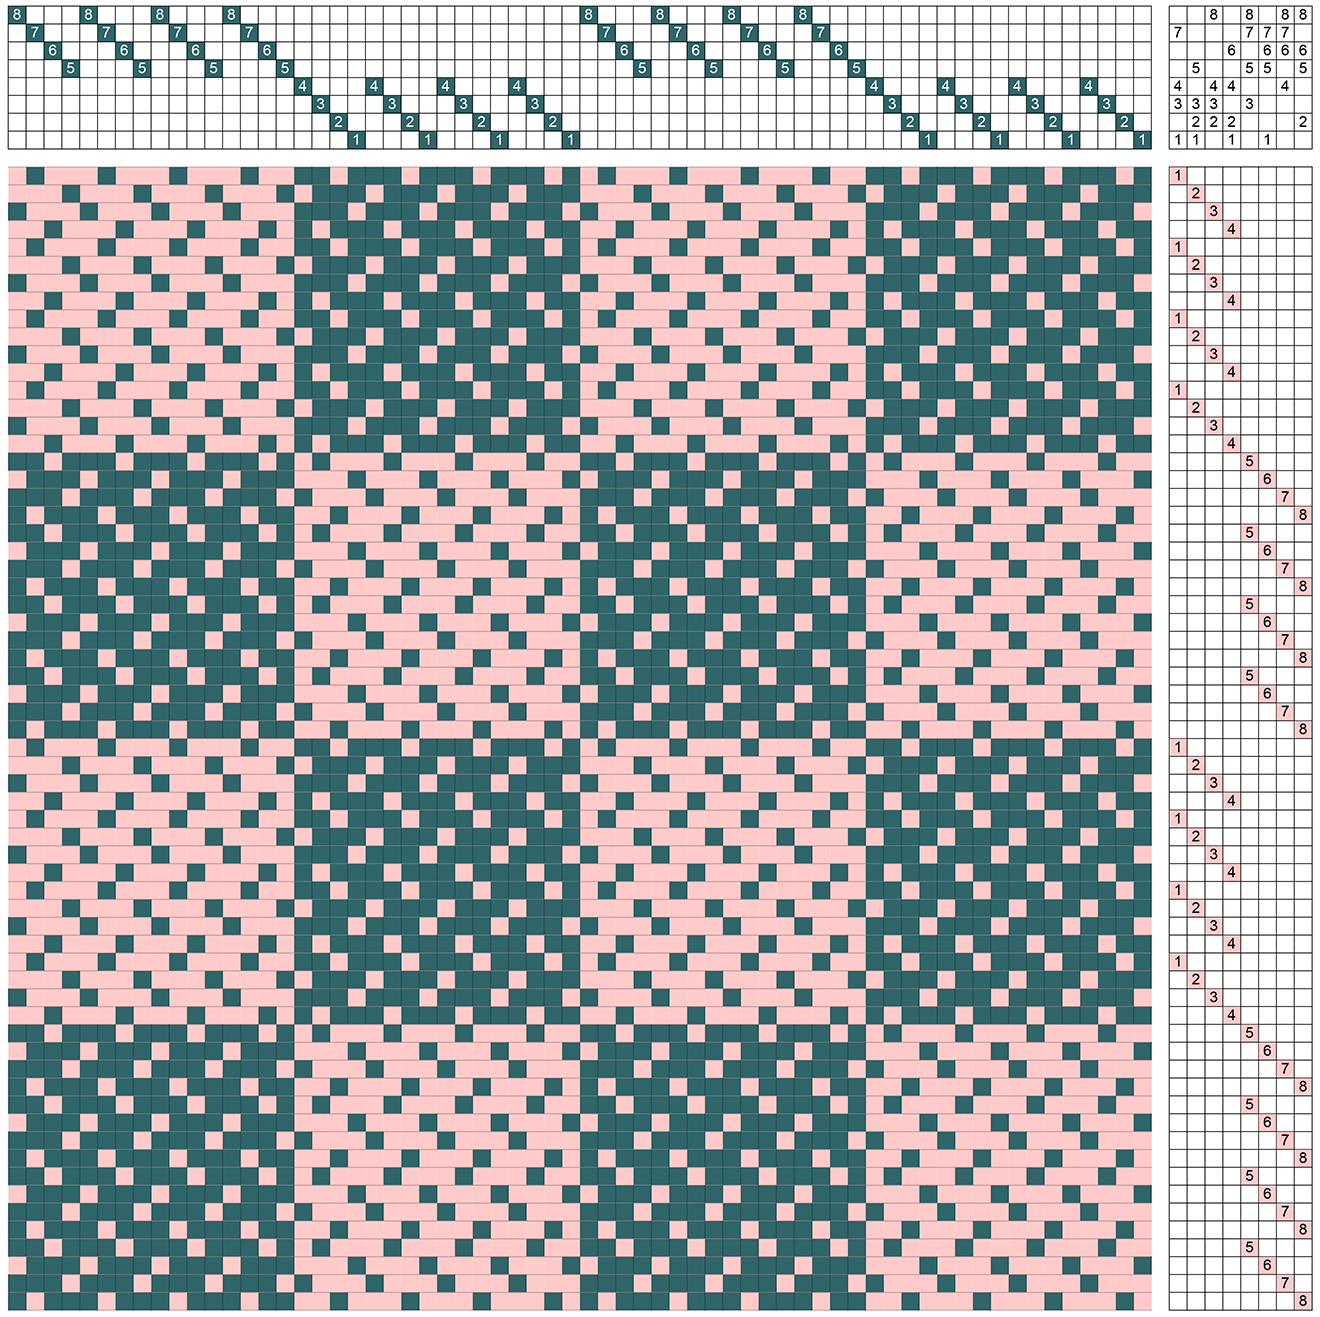
Totally different approach, same result.
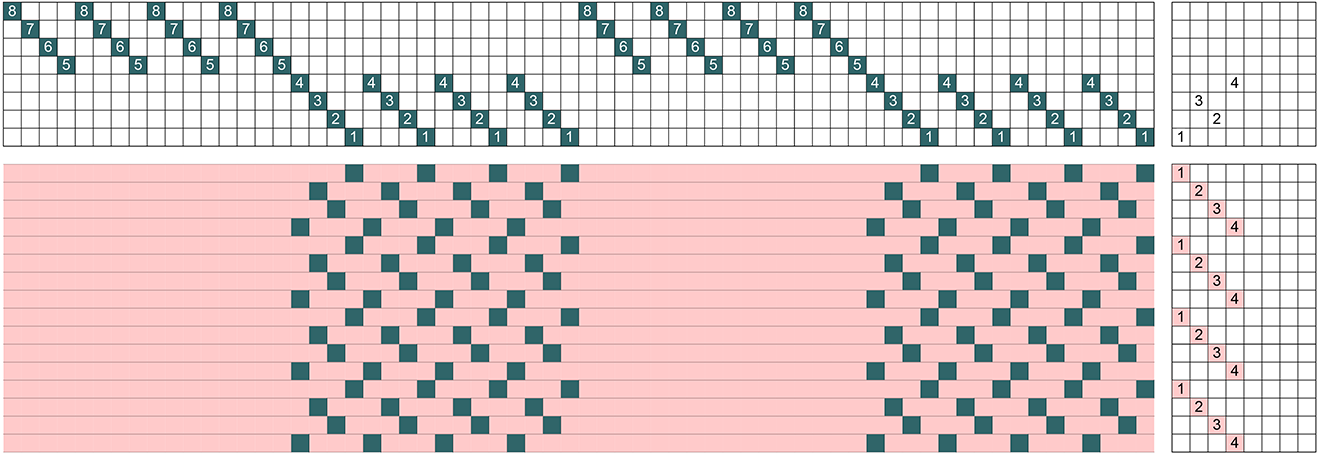
While going through the process, I noticed how the tie-up is organized, which is more obvious when looking at it as filled boxes rather than numbers. On the left is the one we just derived, on the right the one from Strickler.
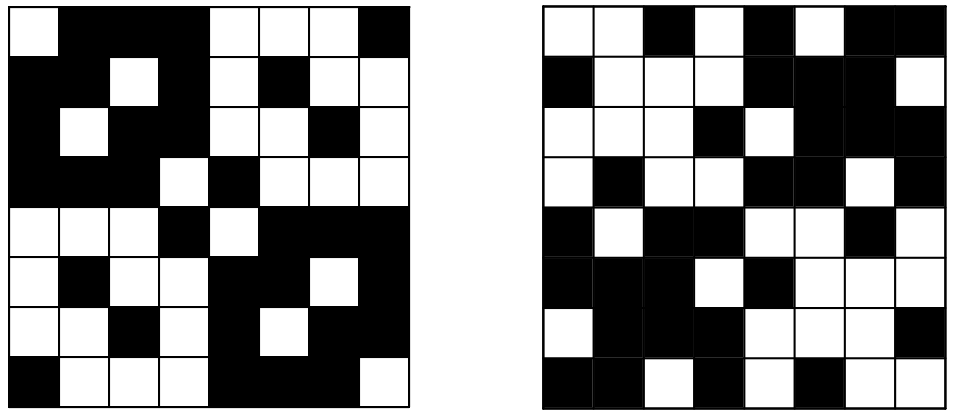
The parallel images of the opposite quadrants and the mirror images of the adjacent quadrants are obvious and can be used to determine a drawdown.
Next time you look at a complicated tie-up, and wonder how the weaver ever arrived at it, now you know!
And the fabric…. The warp is wound…. Stay tuned….
Happy Weaving!
Marcy